September 30, 2011

SVG Spook-tacular Blog Hop Day 1!

Hello everyone and happy Friday to you. It is officially the weekend and we are starting it off with a fun blog hop. The girls over at SVG Attic will be showing you all sorts of fun little Halloween projects all made from SVG Attic's SVG files. If you have arrived from Anna Dawn's blog then you are on the right track! If not and you'd like to start from the beginning please head over to the SVG Attic Blog, where all the action starts.

A few details before I get to my project during the duration of the hop there will be a sale at SVG Attic, just type in the coupon code SVGHOP to get 30% your entire purchase. There is a challenge going on over at the SVG Attic blog right now too, all you have to do is create a Kooky Spooky Project using at least one SVG Attic element and link it up. Check out all the details and link up your project here. Also there will be one grand prize winner of a $30 gift card from comments during the hop so be sure to check out the details over at the SVG Attic Blog. AND Jessica has given each of the design team girls $10 gift cards to giveaway on our blogs so be sure to keep reading for the details.

"Details, details, details, just get on with the project already!" Ok ok here you go:

Well what do you think? Isn't he/she cute, I can't decide if it's a Mr. or Mrs. Frankenstein...anyway on to the project details, I know here I go again with more details :) I used the Spooky Treat Baskets set for this CANDLE! I know you weren't expecting a candle were you, hehe.
So I am sure you can tell it's not paper, but it is vinyl! I have been wanting to do this since I saw this awesome set of SVGs and I could not be happier with it. I started out by making a green butter pecan scented candle in a mason jar I just emptied out of our fridge (yea that timing couldn't have been more perfect). Then I just cut out the face parts of the spooky basket using black, white, and silver vinyl. The eyes were originally vinyl but those cute googly eyes were starring at me from their desktop container screaming to be put on Mr./Mrs. Frankenstein. So do the eyelashes make it a Mrs.? I am so easily taken off track...I finished the candle off with a little black and white twine. Wanna see it lit in the dark? It's really cool looking in person.
The bottom of the candle actually glows a really cool dark redish color while the top glows that awesome lime green! Can you tell I really like my new candle? :) Ok one last look before you head off to the next stop!

If you enjoyed my cute little Mrs. Frankenstein (I decided just now finally) then leave me some love. And if you'd like to just chime in on my fantastically pointless gender discussion about my candle, feel free to leave some love as well. Head over to facebook and become a fan of the Crafty Rocket Science page, if you haven't already, after you leave me some love and at the end of the hop I will draw one winner from all the comments and likes on facebook to receive the $10 SVG Attic gift card. Be sure to stop back tomorrow when there will be another project for the hop and the My Thoughts Exactly stamp release! Trust me you don't want to miss it!

In case you get lost along the hop just pop back here and find where you are on the list:

Now head on over to Raven's blog and happy spook-tacular crafting!

September 25, 2011

Spooky Tree

Hello and happy Sunday to you! I hope you are all enjoying your weekend, I know I am. Today is my design team day over at SVG Attic. I found a really cool tree on Pinterest

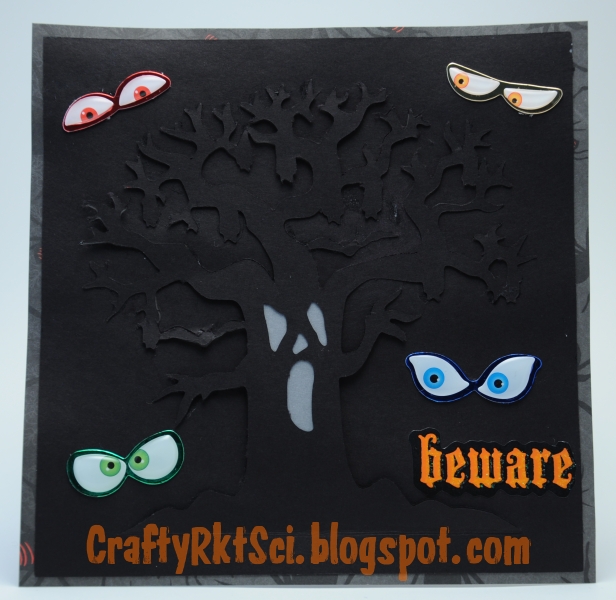
I knew I had to try this as a card for Halloween right away! How cool would it be to have a spooky tree pop out of a card base like this? Ok, maybe only I think that would be really cool :) So I went to work using the 3D spooky tree from the Happy Haunt Halloween Party Kit. I'll explain what I did as you look at the pictures...
I really wanted to use paper that you couldn't really tell what was about to pop out of the page so I went with black, then added the cool spooky eyes to be like creepy crawlies peering out of the dark at you. Are you scared yet? Of course I had to add a little warning in the corner; you never know what may happen. You can see there are a few little spots where the tree is lifted up a little, well if you tug on them a little, this is what happens...
Ahhh the tree is alive! Ok so you could see the face on the tree the whole time but it's still pretty cool. I used the awesome node editing feature in Make the Cut to remove the slit at the bottom of the tree base that would normally be used to put the stand in to make it 3D. I also used the node editing feature to remove the bottom edge of the tree, so that it would just fold up from the page.
It's hard to see in the picture but the background paper is covered in red creepy crawly spiders.
I ran out of my favorite glue as I was finishing this card, so rather than go get some I just used the other glue I had on hand...big mistake! You can see that glue was too wet and made my card curl up, I was sad but not going to start over, it took about 40 minutes to get the tree to cut out using my Cricut. Because the tree is so small, about 5.75 inches square, I had to use the slowest cut speed to get the little intricate cuts to come out ok. Of course I decorated the back with a little message using a set of $1 stickers I got from Target, I think it was. I inked the edges of the back too, white was just a little too harsh of a color contrast from the front :)
Well, I hope you have you weren't too scared by my spooky tree. Here is a little sneak peak of some projects to come. Be sure to stop back September 30 - October 2 for the Sook-tacular Blog Hop, October 1 for the My Thoughts Exactly stamp release party, and October 7-10 for the Fang-tastic Blog Hop! I know there is a lot going on here in the next few weeks and it is all going to be AWESOME!

Happy crafting,

September 22, 2011

My Thoughts Exactly Design Team Thursday

Hello and happy Thursday! I hope your week is going well so far. As I promised here is the SVG and Make The Cut files for the secret message card I showed you on Monday. If you'd like to see a tutorial on how to put it together please watch Dawn's video here (that's where I got the card idea from).

Ok now on to my project for today. As I am sure you have heard by now or may have seen over there-> on the side there is going to be a My Thoughts Exactly stamp release on October 1st! Today I have a fun little project to preview a few of the stamps, trust me you are going to love these. I'll let you guess the theme :)

Aren't they cute? I just love the fun colors. First I have a little 3x3 card using a $1 stamp from Michael's that I jazzed up with some Trendy Twine.
And on the inside a spooky little sentiment. I did the old scan and trace to create a layered background for the stamp then sprayed it with some glimmer mist. I know you can't see the sparkle in the picture but it's there I promise :)
Now to go with my little card I have a fun treat box. Well actually it was suppose to be a jam box, but I had a little mishap with Make the Cut and it came out a little too small for a jar so it's now a treat box. I wonder what's in it? The box file was designed by my fellow My Thoughts Exactly Design Team member, Lenae. In fact you can hop over to her blog and pick up the file for yourself, it's right at the top on the left sidebar.
I am just loving the fun colors for Halloween! And that bat is so darn cute, he can be found at The Digi Bistro in the Pick Your Poison set. I actually won this set for that BOO tag I made last week, each week Cher hosts a challenge on her blog, you should check it out. The box even looks cool when it's open.
MMM chocolate! My favorite :)
Ok, so this is a cute box, but where is the stamps? Take a closer look...
Look closer see it yet?
There it is! A fitting sentiment for a box full of candy!
I am just in love with this little bat on his curly wire. Yes he deserved a picture all to himself :)

Well that is all for today, I hope you enjoyed my fun little treat box and card. Be sure to stop back and check out all the blog hops and releases that will going on in the next few weeks. Until next time...here's witching you happy crafting!

September 19, 2011

SVG/MTC Monday

Happy Monday everyone. It's another SVG/MTC Monday over at The Scrapoholic. The wind is blowing and the air is crisp, that can only mean one thing, Halloween is just around the corner. Today Jill has some super cute Disney Halloween files for you, so be sure to stop by and pick them up for free! I found a tutorial online for a secret message card and just knew I had to try it. I'll post a link to the tutorial and a file I created to make the card later in the week (I have to work a few kinks out in the file first). So with out further ado here's my card, let the picture overload begin :)

I chose the cute little Mickey Jack-o-Lantern for my card. The paper is all from K&Company and the stamps are all from the dollar bin at Michael's.
Aren't those little buttons just adorable? The holes in them were so small that Trendy Twine wouldn't fit through, well that was not going to stop me! The coolest part about Trendy Twine is that is has four strands per piece of twine, so I simply cut off a length and divided it into to parts with two strands each, one black and one orange. Voila, it now fit through my button holes :) I was very determined that Trendy Twine would be on this card.
Please note that I tried cutting my Mickey out too small for the Cricut so he didn't come out as great as if he were a little larger (he is about 3.25" wide).
So, here is the inside of the card when you open it...notice the little note on how to find the hidden message? Here is how you get to it, fold the card in half like this:
Keep folding until the middle splits open like so:
Pull it open to reveal the hidden message :)
Isn't it fun? Want to make one of your own? I had a few issue making this card, but I'll get all the kinks worked out and get a file posted for you later this week! Have a wonderful rest of the day and be sure to stop back to get your Hidden Message File.

Happy crafting,

September 13, 2011

My Thoughts Exactly Design Team Tuesday?

Ok so it's not the usual design team day at My Thoughts Exactly, but a few of the girls decided we were going to do a bonus post sometime this week. For the last stamp release Alyssa included a little gifty for all the DT girls, 6x6 Springtime Paper Packs from Echo Park! I was so excited when I saw the paper, the designs are me to a t! So of course I couldn't wait to use them. But every time I sat down to make something with them, the papers were too pretty to cut...I know I know, it's paper it's meant to be cut. Well this week a few of us decided that we would use the paper Alyssa got us and her stamps to create projects. There was no turning back now, I had to cut my beloved paper...I cringed a little as the blade sliced through the first piece. Ok that wasn't so bad, I can finish...I few more slices and a few passes through the Cuttlebug with Spellbinder's Nestabilities and tada it's done!

I used the Sweet Thoughts set for all the stamps! This set is a must have, the sentiment options are endless.
I even stamped a sentiment on the inside of the card, I never do that! The squares are popped up off the front with foam tape and the inserts that were cut out with the Nestabilities are flipped over to reveal the other side of the paper and glued above/beneath the matching square.

I hope you enjoyed my project today! Be sure to stop by and check out Lenae's project too!
Happy crafting,

September 12, 2011

For Sue

Hello everyone, I hope you are having a good Monday! Last week I mentioned that I had created two boxed card sets for a friend who is battling lung cancer. This Saturday there will be a silent auction for her, to help raise medical expense funds. I am honored to have my work go to such a great cause. I know I promised you pictures last week but life happens. There are eight cards in each set, there were eight sentiment stamps in each of the Stampin' Up! stamp sets I used.


The above eight cards are in the red box and the remaining cards are in the black box.


I took a sketch I saw somewhere and used it for each of the cards along with the color scheme of blacks and whites with a pop of color. I hope they bring a smile to Sue's face when she's sees them at the auction for the first time. Her family has kept all the donations a secret from her, I just wish I could be there. It will certainly be a tear filled day.

Happy crafting,

September 11, 2011

Boo!

Hello again! I know two posts in one day that's unheard of from me :) I have two more projects I've been working on. The first is a card that I created using the challenges at Our Creative Corner (wonderful windows) and CAS-ual Fridays (fall paper piecing).
The window is actually made from acetate paper and then wrapped in Chocolate Truffle Trendy Twine to look like the muntins (yes I had to look that word up). The sentiment stamp and leaves are from Stampin' Up.
That cute little pumpkin pile is from SVG Attic's Pumpkin Patch set.

And the second is a fun little tag for the This to That challenge over at Cher's Studio. Cher is the owner of The Digi Bistro, yet another SVG shop that has super cute designs. Here I used one of the FreeBees over at SVGs by Bee along with a few $1 stamps I got at Michael's. There is of course some Orange Licorice Trendy Twine attached.

Have a wonderful week and happy crafting!

Welcome Great Pumpkin!

Hello everyone and happy Sunday to you. First I want to say thank you to all the men and women who serve or have served our country and our freedom. To those that gave their lives on 9/11/01 we will never forget.

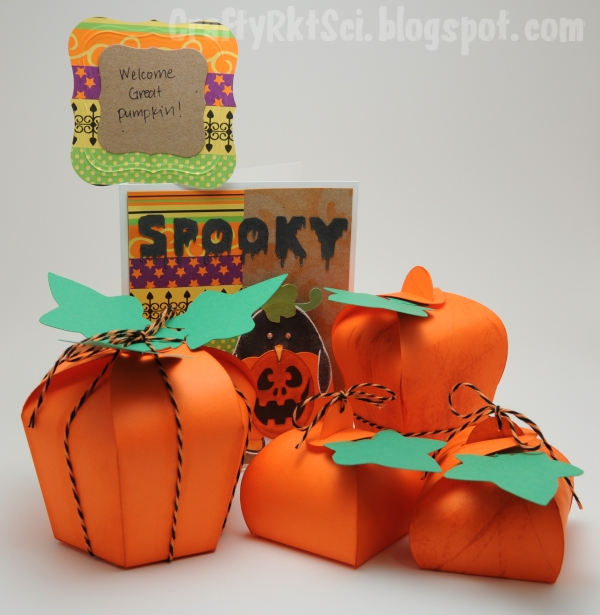
Now I have some exciting news to share with you (although you may already know), I have been chosen to be on the SVG Attic design team. If you haven't already please be sure to stop by the SVG Attic store and check out all the cute SVG files available. Today I have a pumpkin patch and little card using the puffy boxes set, pumpkin patch set, and the fall celebration set. There are lots of pictures so I'll let them speak for themselves :)

Isn't that little penguin the cutest!?! I love penguins so I couldn't resist putting him in a Halloween costume :) The pumpkin costume is made from the pumpkin patch set.
See those spooky skulls on the background? Those were inked on the kraft paper using one of the faces from the pumpkin patch set, I happened upon the technique while I was inking the edges of the penguins costume.

And here is my little pumpkin patch. My favorite Halloween story is Charlie Brown and the Great Pumpkin, can you tell? Here are close ups of each pumpkin, which are all puffy boxes with the leaves from the fall celebration kit that can be filled with little Halloween treats!


And here is everything all together. The penguins eyes are a little creepy in this picture... 
 

I hope you all enjoy your Sunday! Happy crafting!